

How to Connect an AI Assistant to ERPNext Using the API
This guide shows you how to connect an AI assistant to your ERPNext instance so it can look up customers, summarise sales, check stock, and (only if you allow it) create and update records. It covers the three layers that make that work: a dedicated ERPNext user with an API key and secret, an MCP (Model Context Protocol) bridge for assistants such as Claude, and direct REST API calls for your own scripts and agents. It is written for anyone running ERPNext on their own server, including ERPNext instances deployed and hosted by Noiz.
Last reviewed: 3 August 2026, against ERPNext v16 (built on Frappe Framework v16, the current stable series; v15 remains supported, and the endpoints and authentication this guide uses are unchanged on it, though every command here was verified on v16 only). The API examples and the Claude Desktop bridge in this guide were tested against a live ERPNext v16 install; the Frappe Assistant Core path is described from that project’s own documentation. This guide is written for Noiz hosting and is kept current against ERPNext. It complements, and does not replace, the official Frappe and ERPNext documentation linked below.
Official Documentation Reference
Section titled “Official Documentation Reference”- Frappe REST API reference: the authoritative reference for the HTTP API that ERPNext exposes, including authentication and the resource and method endpoints.
- Token-based authentication (Frappe): how API key and secret pairs work, in the REST API reference.
- ERPNext documentation: the user and administrator documentation for ERPNext itself.
- ERPNext and Frappe supported versions: which major versions currently receive updates.
- Model Context Protocol: the open standard that lets AI assistants use external tools, including ERPNext.
- Frappe Assistant Core (GitHub): the open-source in-app MCP server referenced below.
Prerequisites
Section titled “Prerequisites”- An ERPNext instance reachable over HTTPS, and a login on it with the System Manager role (needed to generate API keys). On a Noiz-deployed instance the URL is in your welcome email.
- For the Claude Desktop section: Node.js 20 or newer on the computer where your AI client runs, since the bridge used there is started with
npx.
How an AI Connects to ERPNext
Section titled “How an AI Connects to ERPNext”ERPNext is built on the Frappe Framework, and it is Frappe that provides the HTTP API. Two pieces do the work of connecting an AI to it:
- The Frappe REST API is the socket on the ERPNext side. You send HTTPS requests to
/api/resource/<DocType>(a DocType is Frappe’s name for a record type, such as Customer or Sales Order, and this endpoint reads and writes records of that type) or/api/method/<method>(to call a named function), authenticated with an API key and secret. - MCP (Model Context Protocol) is the plug on the AI side. Assistants do not know your ERPNext’s API on their own; MCP servers are small programs that hand them ready-made, discoverable tools instead of raw HTTP calls. An MCP bridge for ERPNext translates the AI’s tool calls into REST API requests.
The security model is the part to get right. An API key and secret pair is not a separate account: it authenticates as a specific ERPNext user and inherits all of that user’s roles and permissions. Whatever the user can see, the AI can see; whatever the user can change, an AI with a read-write bridge can change. So the first step is a dedicated user, not a key on your own administrator account. This matters more on ERPNext than on some other systems, because the community MCP bridge in the quick-start path below has no built-in read-only mode: the ERPNext user’s own permissions are the boundary that counts.
Step 1: Create a Dedicated ERPNext User for the AI
Section titled “Step 1: Create a Dedicated ERPNext User for the AI”Give the AI its own identity with the minimum access it needs. Its activity then shows in logs under its own name, you can cut it off by disabling one user, and a leaked key exposes only what that user could reach.
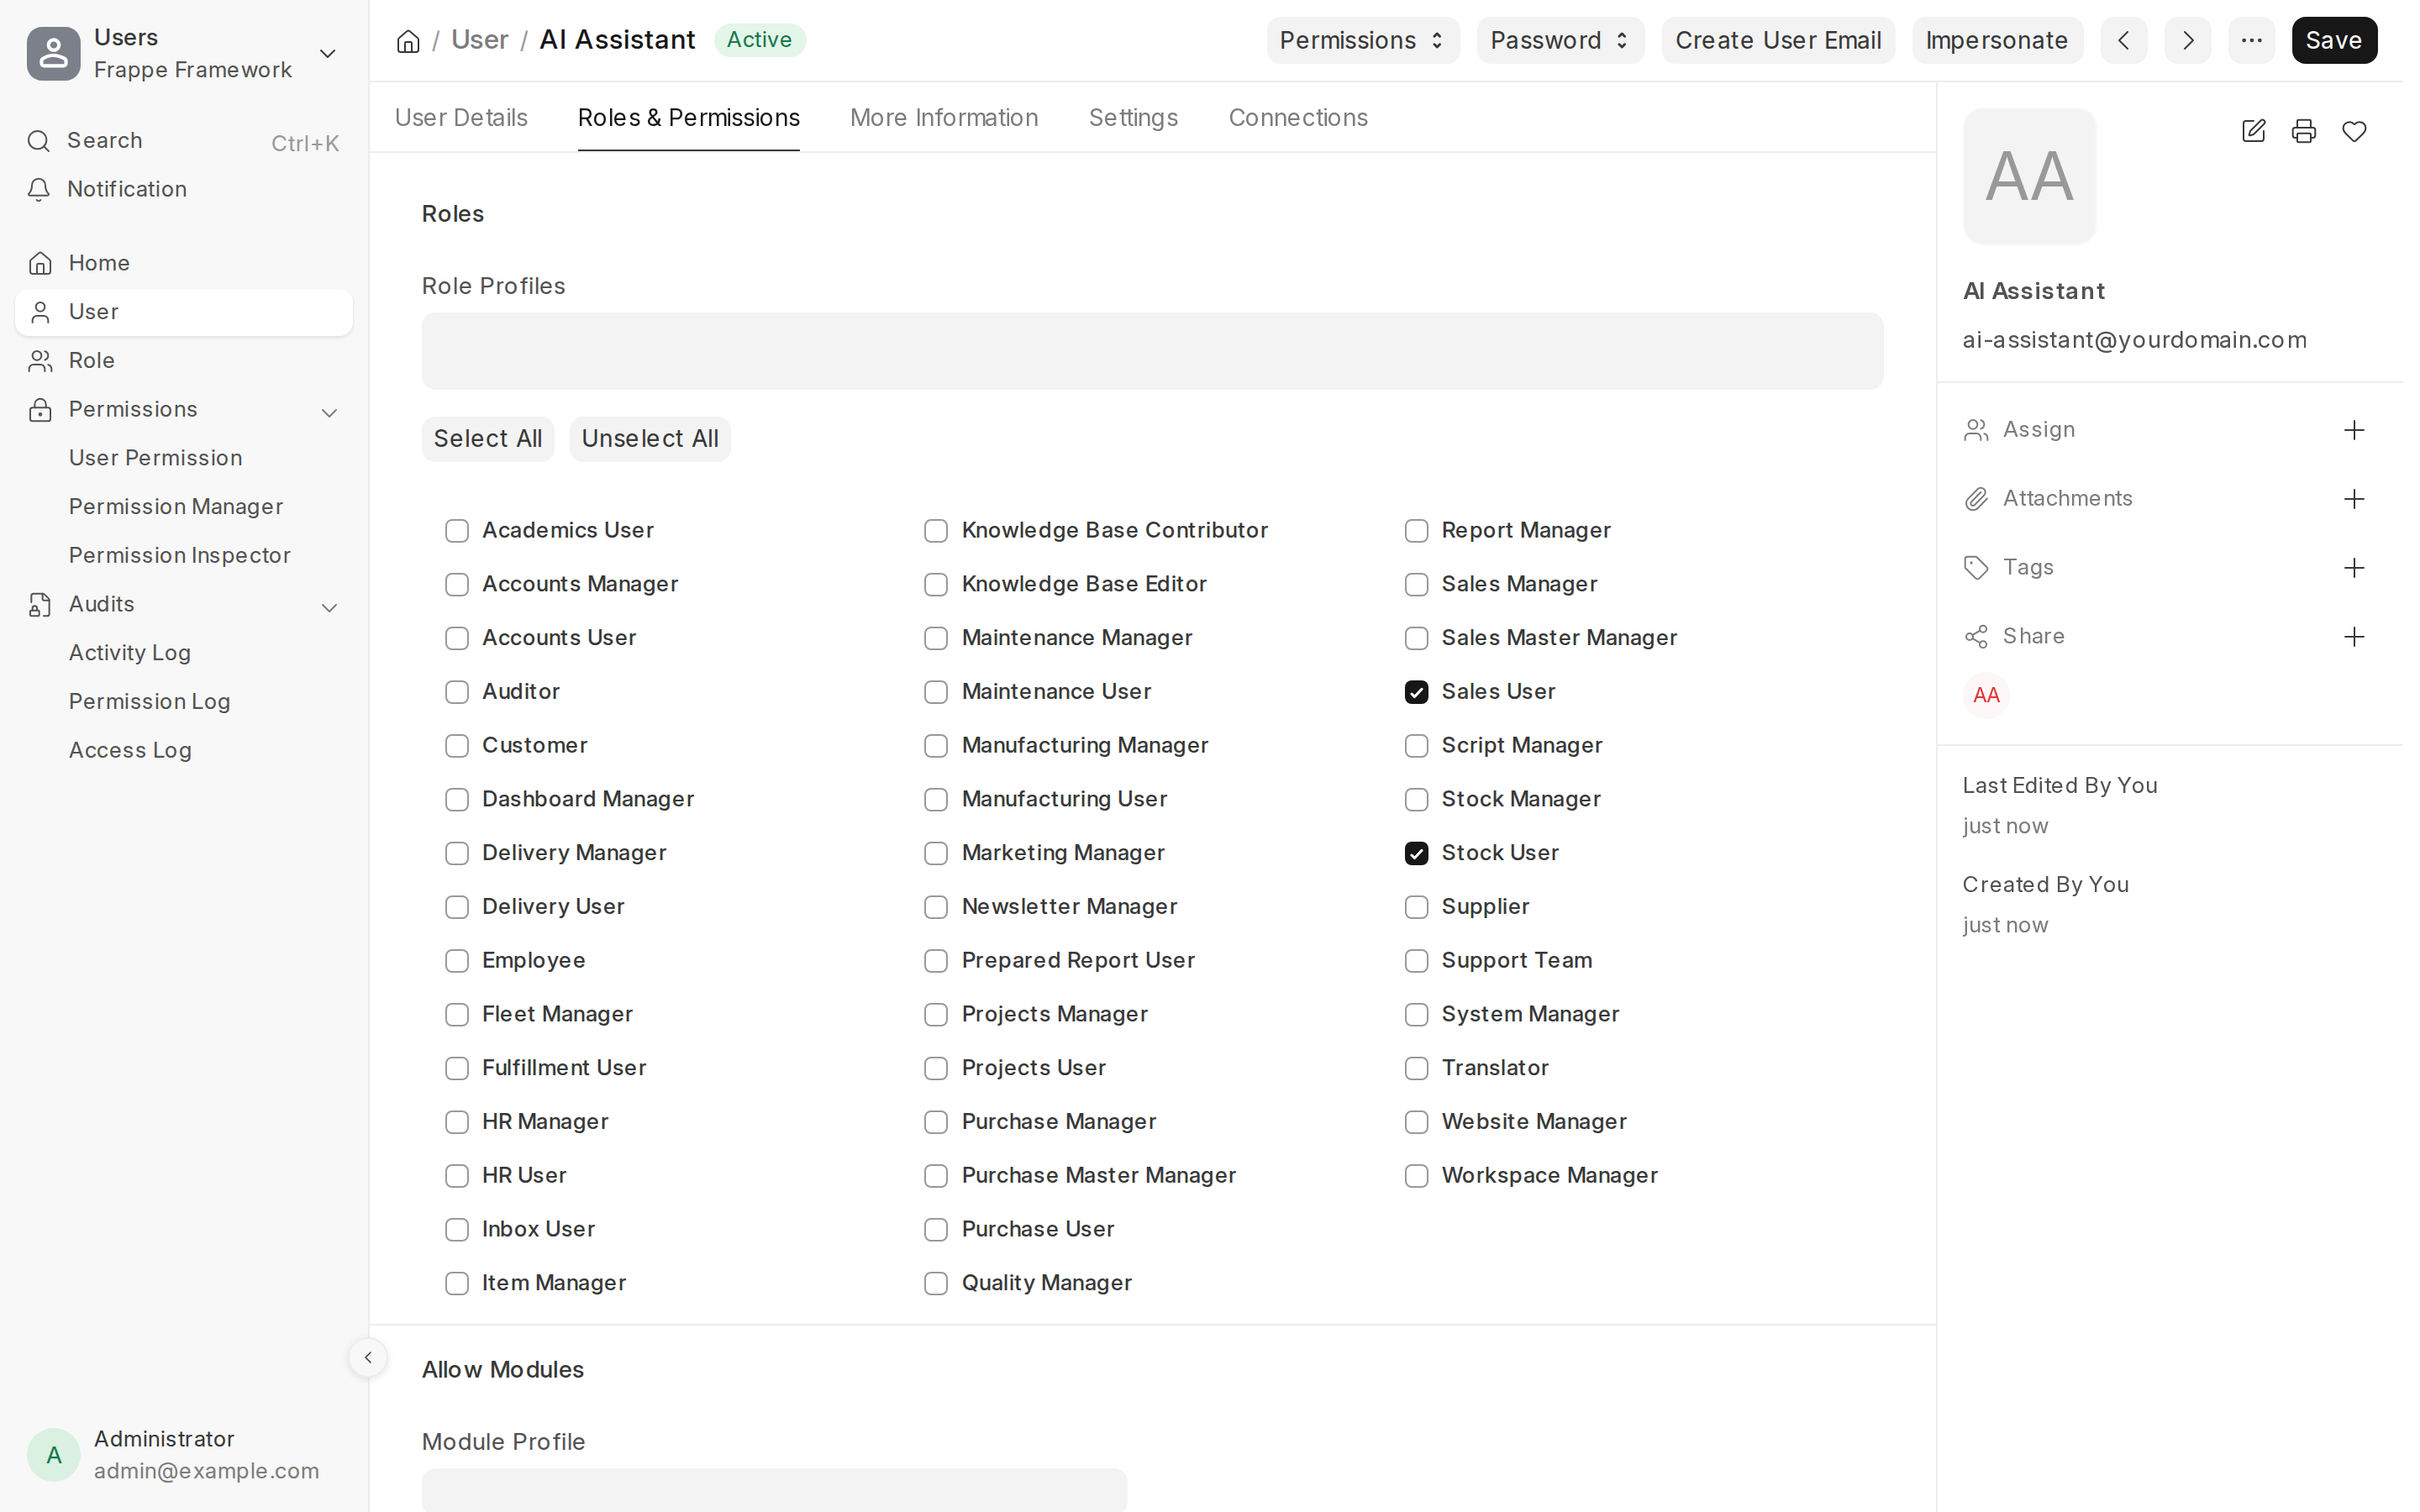
- In ERPNext, go to the Users list (search “User List” in the search bar at the top of the screen) and click Add User.
- Give it a clear email such as
ai-assistant@yourdomain.com(replaceyourdomain.comwith your own domain) and a first name likeAI Assistant. Save. - On the Roles & Permissions tab, under Roles, grant only what the assistant genuinely needs. For a read-and-report assistant, add the read-oriented roles for the areas it should see (for example Sales User or Stock User) and nothing more. Do not give it the System Manager role, and never wire the AI to the built-in Administrator account.
- Consider restricting it further with a Role Profile (a saved bundle of roles you can apply in one step) or User Permissions (per-user rules that limit which specific records, such as one company’s, the user may see). Start narrow; you can widen access later.
Step 2: Generate an API Key and Secret
Section titled “Step 2: Generate an API Key and Secret”API keys are generated on the user’s own record, by someone with the System Manager role.
- Open the AI user’s record in the User list.
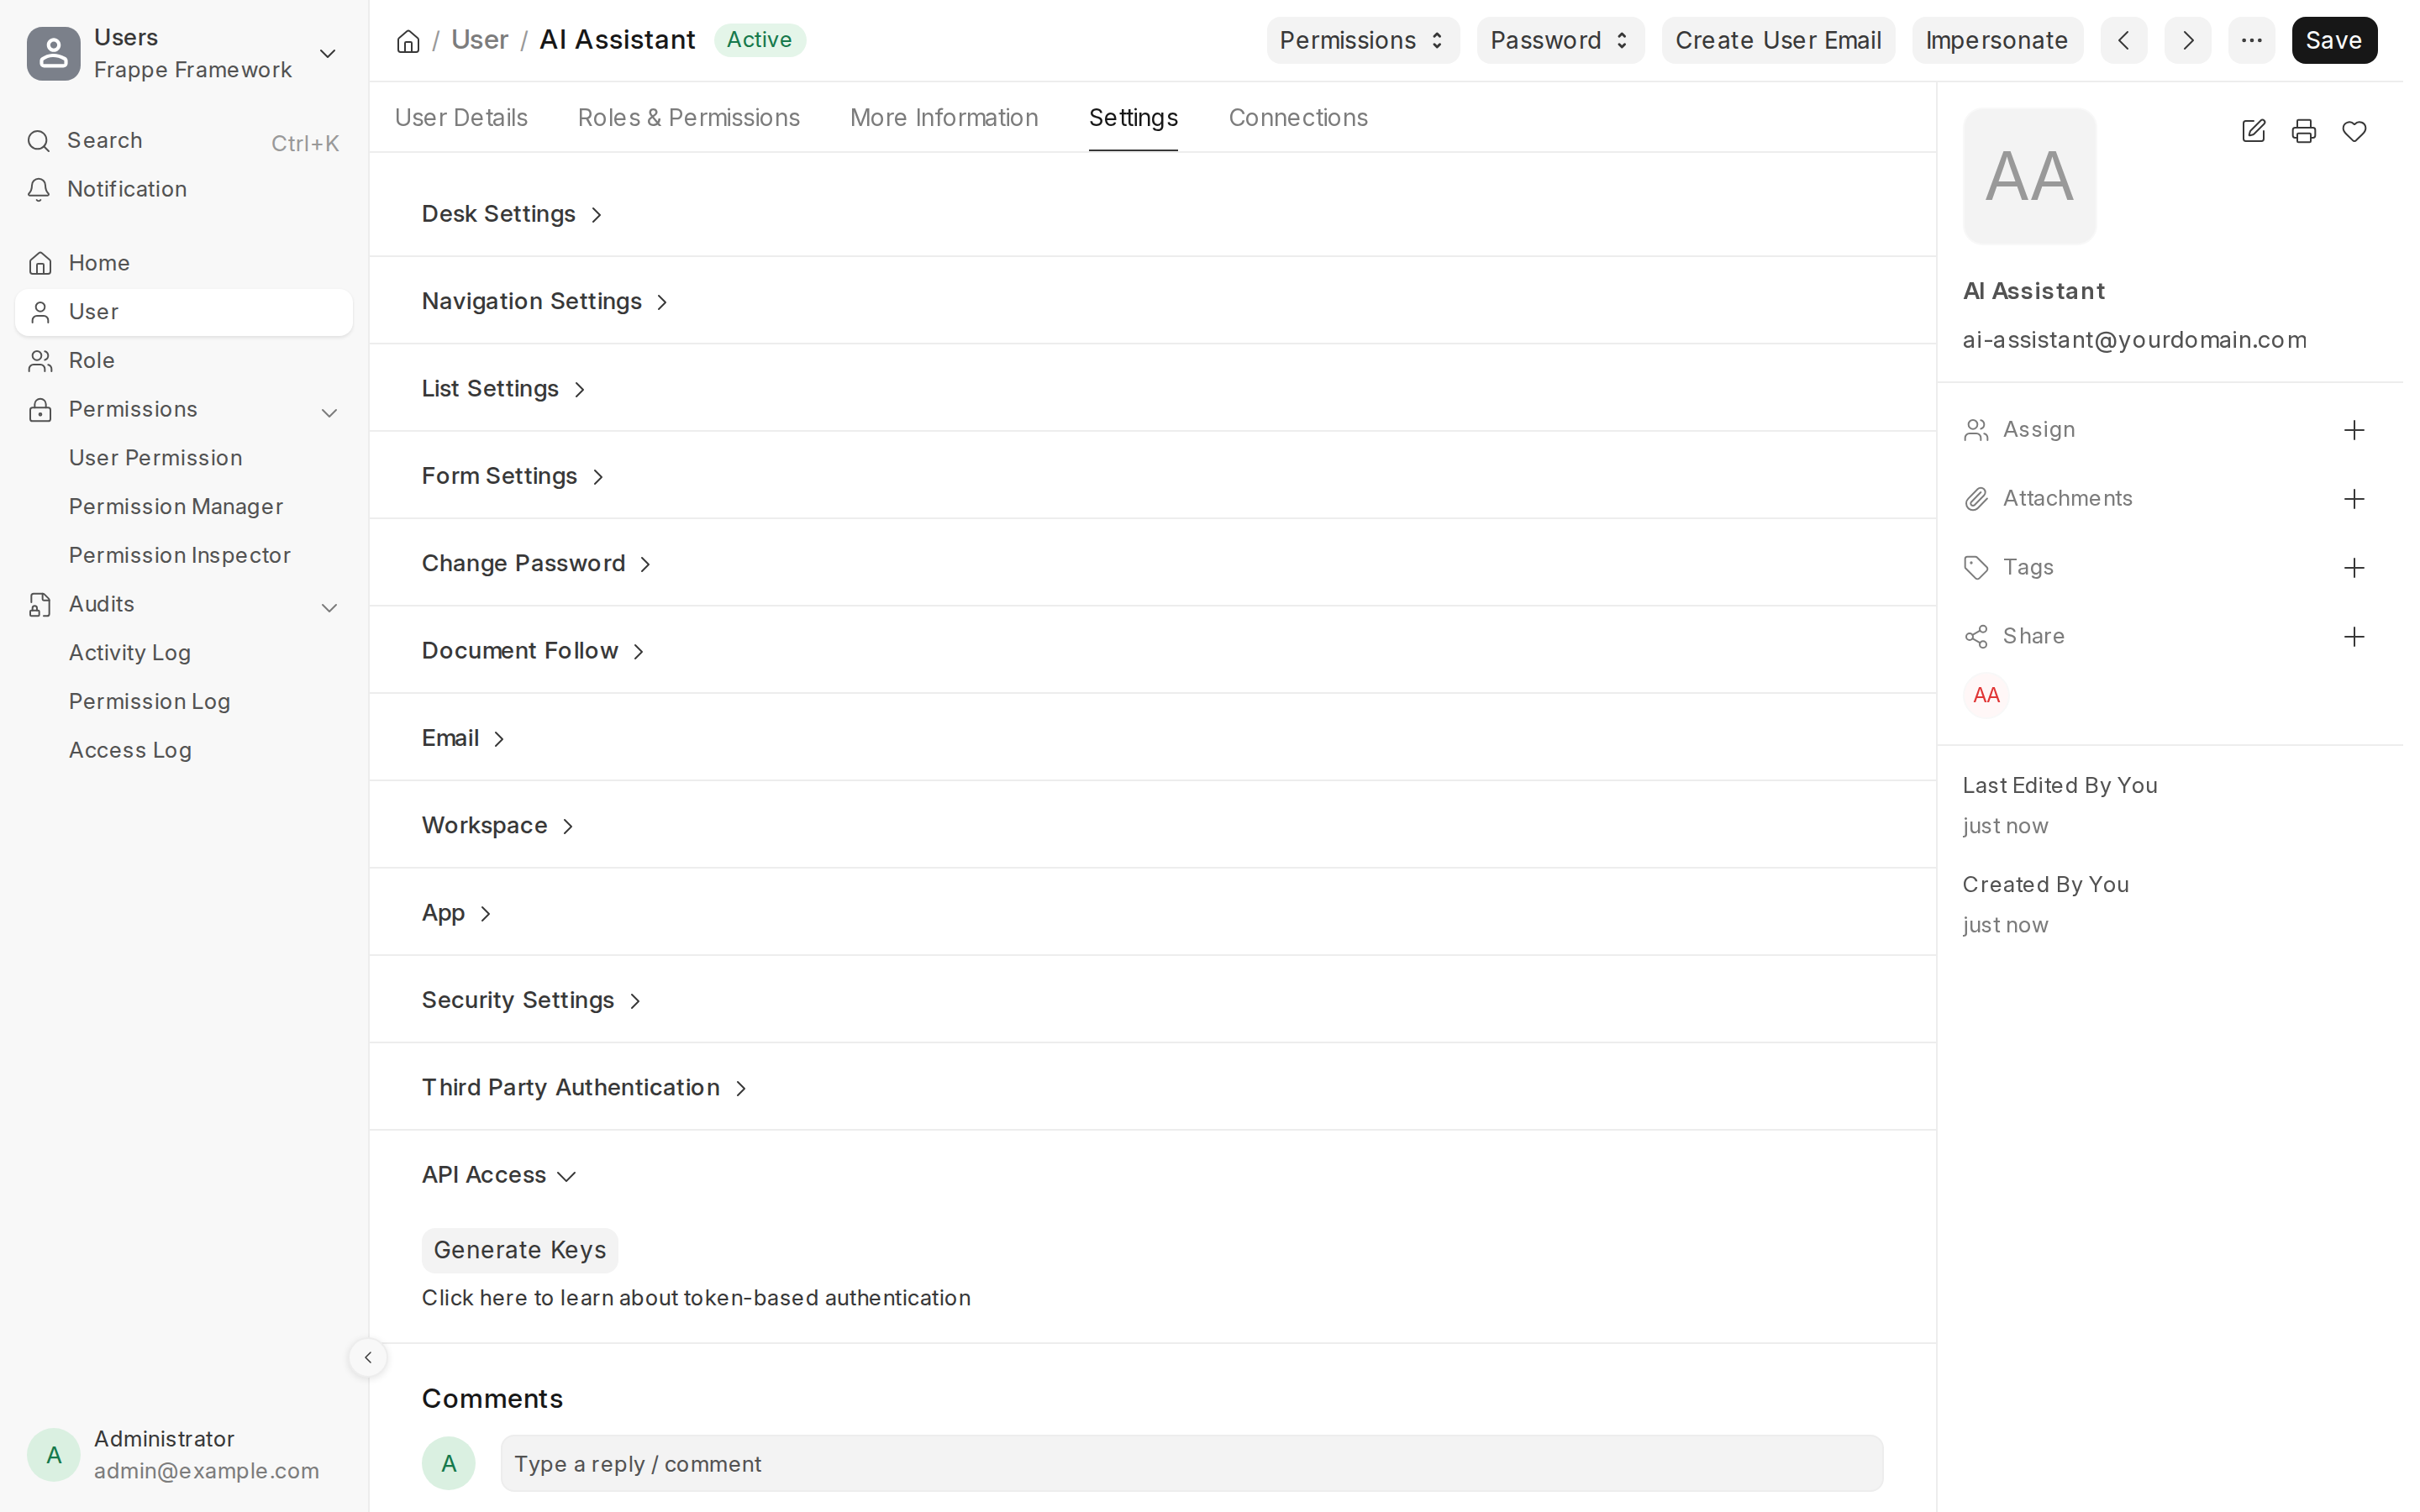
- On the user’s Settings tab, scroll to the API Access section and click Generate Keys.
- ERPNext shows an API Keys dialog containing the API Key and the API Secret. The API Secret is shown only once, here. Copy both immediately and store them in a password manager. If you lose the secret you cannot read it back: click Generate Keys again to issue a new secret. The API key itself stays the same, and the previous secret stops working.
The two values are used together as a single credential. In every request the AI (or your own code) sends the header Authorization: token <api_key>:<api_secret>, the key and secret joined by a colon.
Step 3: Connect Claude Through an MCP Bridge
Section titled “Step 3: Connect Claude Through an MCP Bridge”For an individual using Claude, the quickest path is a local bridge that talks to ERPNext’s stock REST API, with nothing installed inside ERPNext itself. A maintained option is @casys/mcp-erpnext (published on npm, MIT licence), run on demand with npx.
For Claude Code, one command registers it:
claude mcp add erpnext \ --env ERPNEXT_URL=https://erp.yourdomain.com \ --env ERPNEXT_API_KEY=your-api-key \ --env ERPNEXT_API_SECRET=your-api-secret \ -- npx -y @casys/mcp-erpnextFor Claude Desktop, add it to claude_desktop_config.json (Settings, then Developer, then Edit Config):
{ "mcpServers": { "erpnext": { "command": "npx", "args": ["-y", "@casys/mcp-erpnext"], "env": { "ERPNEXT_URL": "https://erp.yourdomain.com", "ERPNEXT_API_KEY": "your-api-key", "ERPNEXT_API_SECRET": "your-api-secret" } } }}Replace erp.yourdomain.com and the key and secret with your own values. Restart the client and the ERPNext tools appear automatically. From there you can ask things like “list our customers in the Selling module” or “how many open sales orders are there”, and the assistant answers from your live data.
Two honest caveats belong here. First, this bridge exposes the full read and write surface of the REST API with no separate read-only switch and no change-preview step, so the dedicated low-privilege user from Step 1 is your only real guardrail. Give it read-only roles until you have a specific, reviewed reason to let it write. Second, the configuration file (and your shell history) holds the key and secret in clear text, protected only by your operating system account; that is standard for MCP configuration, and it is why the key belongs to a least-privilege user you can revoke from the API Access section at any time.
This local npx pattern works with Claude Desktop and Claude Code, which run the bridge on your own machine. It does not apply to Claude on the web or to ChatGPT, which connect from the cloud and cannot reach a program on your laptop. For those, use the shared-endpoint approach below.
Connecting ChatGPT, Claude on the Web, or a Whole Team
Section titled “Connecting ChatGPT, Claude on the Web, or a Whole Team”To give a whole team, or a cloud assistant such as ChatGPT or Claude on the web, one shared connection, the pattern is different: install an MCP server inside ERPNext, so the instance itself exposes an MCP endpoint on its existing HTTPS address. A maintained open-source option is Frappe Assistant Core, a Frappe app you install on the site with bench get-app and bench install-app. It exposes a remote MCP endpoint secured with OAuth, scopes every call to the signed-in ERPNext user’s roles, and keeps an audit log. It is AGPL-licensed and free to install on a self-hosted instance (it also appears, listed as paid, on the Frappe Cloud marketplace). Register its endpoint as a custom connector in ChatGPT (which requires Developer Mode) or Claude, and complete the OAuth sign-in as described in the project’s own setup guide.
If you run a Noiz-managed ERPNext instance and want a server-side MCP endpoint installed and secured for you, open a support ticket and the Noiz team will scope it with you. For workflow automation rather than chat, ERPNext also has a built-in node in n8n that uses the same API key and secret.
Calling the API Directly From Your Own Code
Section titled “Calling the API Directly From Your Own Code”For scripts, scheduled jobs and custom agents, skip MCP and call the REST API directly. To read a list of records, GET /api/resource/<DocType>. A quick test with curl:
curl -G "https://erp.yourdomain.com/api/resource/Customer" \ --data-urlencode 'fields=["name","customer_type"]' \ --data-urlencode 'limit_page_length=5' \ -H "Authorization: token your-api-key:your-api-secret"The -G and --data-urlencode flags both matter: -G keeps this a GET request (without it curl would POST the data, which on /api/resource/Customer would try to create a record), and --data-urlencode encodes the brackets and quotes in fields so the command stays pasteable.
The same call from Python, using only the standard library:
import jsonimport urllib.parseimport urllib.request
ERPNEXT_URL = "https://erp.yourdomain.com"API_KEY = "your-api-key"API_SECRET = "your-api-secret"
def erpnext_get(doctype, fields, limit=20):    query = urllib.parse.urlencode({        "fields": json.dumps(fields),        "limit_page_length": limit,    })    req = urllib.request.Request(        f"{ERPNEXT_URL}/api/resource/{doctype}?{query}",        headers={"Authorization": f"token {API_KEY}:{API_SECRET}"},    )    with urllib.request.urlopen(req) as resp:        return json.load(resp)["data"]
for customer in erpnext_get("Customer", ["name", "customer_type"]):    print(customer["name"], customer["customer_type"])
Four things about the REST API that are not obvious from the examples:
- Ask for the fields you want. A plain
GET /api/resource/<DocType>returns only thenameof each record, and only the first 20 rows. Passfields(a JSON array) andlimit_page_lengthexplicitly, as above, or you will think the data is missing when it is only unrequested. - Reading and writing use different verbs. GET reads, POST creates, PUT updates, DELETE removes. A
PUTsends only the fields you want to change, so you do not have to resend the whole record. - Named functions live under
/api/method. Whitelisted server methods (functions a developer has explicitly marked as callable over HTTP) are called as/api/method/<dotted.path>; a GET runs read-only methods, a POST runs ones that change data. Results come back under amessagekey, whereas record data from/api/resourcecomes back underdata. - There is a newer
/api/v2in the code. Recent Frappe versions ship a second API version, but as of this writing it is not covered by the official documentation, so build new integrations on the documented/api/resourceand/api/methodendpoints above and treat v2 as subject to change.
Security Essentials
Section titled “Security Essentials”- HTTPS only. The key and secret travel in a header on every request. A Noiz-deployed ERPNext instance is served over HTTPS already; never point an integration at a plain
http://URL across the internet. - One key pair per integration. Give Claude, your reporting script and any third-party tool their own users and keys, so revoking one never breaks the others.
- Least privilege is the real boundary. The AI user’s roles are the only hard limit, and the quick-start bridge has no read-only mode of its own. An AI assistant will act on a confused or malicious instruction; if the user it authenticates as cannot touch payroll or accounts, no prompt can make it.
- Start read-only. Give the AI user read roles first, and add write access only for a specific, reviewed task.
- Revoke deliberately. If a secret is ever exposed, open the user’s API Access section and click Generate Keys again to issue a new secret, which stops the old one working, or disable the user entirely.
Troubleshooting
Section titled “Troubleshooting”- Symptom:
403 Forbidden, or the request is treated as the Guest user: theAuthorizationheader is absent or malformed, so ERPNext never sees a credential. It must readAuthorization: token <api_key>:<api_secret>, with a colon between the two values. - Symptom:
401 Unauthorizedwith anAuthenticationErrorabout the API secret: the header is present but the key and secret do not match, or the secret is wrong. Click Generate Keys again on the user’s API Access section to issue a new secret and update your configuration; the secret is shown only at generation time. - Symptom: a list call returns only record names, or only 20 rows: that is the default. Pass
fieldsas a JSON array and setlimit_page_lengthto the page size you want. - Symptom: the AI authenticates but sees no records, or far fewer than expected: roles and permissions. The key acts as its user, so open that user’s Roles and any User Permissions; what the user cannot see, the API will not return.
- Symptom: the
npxbridge does not start: confirm Node.js 20 or newer is installed, and thatERPNEXT_URL,ERPNEXT_API_KEYandERPNEXT_API_SECRETare set correctly in the configuration.
ERPNext on a properly secured server, plus a scoped API key, gives you an AI assistant that can genuinely work your business data without handing your books to a third party. If you would like ERPNext deployed and hosted for you, or help wiring an assistant to an instance Noiz already manages, open a support ticket with the Noiz support team and describe what you want the assistant to do.