

How to Connect an AI Assistant to Odoo Using the API
This guide shows you how to connect an AI assistant to your Odoo Community instance so it can look up customers, summarise your pipeline, check invoices, and (only if you allow it) create and update records. It covers the three layers that make that work: a dedicated Odoo user and API key, an MCP (Model Context Protocol) bridge for assistants such as Claude, and direct API calls for your own scripts and agents. It is written for anyone running Odoo Community on their own server, including Odoo instances deployed and hosted by Noiz.
Last reviewed: 3 August 2026, against Odoo 19.0 (Community Edition, the current stable release). Every command in this guide was tested against a live Odoo 19.0 install. This guide is written for Noiz hosting and is kept current against Odoo. It complements, and does not replace, the official Odoo documentation linked below.
Official Documentation Reference
Section titled “Official Documentation Reference”- External JSON-2 API (Odoo 19.0 developer reference): the authoritative reference for the current API, including authentication, request format and error handling.
- External RPC API (XML-RPC and JSON-RPC, legacy): the older API that still works today and remains the only option on Odoo 18 and 17.
- Odoo standard and extended support: which Odoo versions are currently supported.
- Model Context Protocol: the open standard that lets AI assistants use external tools, including Odoo.
- mcp-odoo bridge (GitHub): the open-source MCP server used in this guide (MIT licence).
Prerequisites
Section titled “Prerequisites”- An Odoo Community instance reachable over HTTPS, and its database name. On a Noiz-deployed instance both are in your welcome email; the database name is also visible in the URL bar on some screens.
- Administrator access to that Odoo instance, so you can create a user and set access rights.
- For the Claude section: uv installed on the computer where your AI client runs. The bridge is started with its
uvxcommand, so no manual Python setup is needed.
How an AI Connects to Odoo
Section titled “How an AI Connects to Odoo”Two pieces do the work, and it helps to keep them straight:
- The Odoo external API is the socket on the Odoo side. Odoo 19 ships a new HTTP API called the JSON-2 API: you POST a JSON body to
/json/2/<model>/<method>on your instance and authenticate with an API key. The older XML-RPC and JSON-RPC endpoints still work but are formally deprecated, with removal scheduled for Odoo 22. - MCP (Model Context Protocol) is the plug on the AI side. Assistants do not know your Odoo’s API on their own; MCP servers are small programs that hand them ready-made, discoverable tools, with safety gates such as read-only defaults, instead of raw HTTP calls. An MCP bridge for Odoo translates the AI’s tool calls into external API requests.
The security model is the important part. An API key is not a separate account: it acts as a specific Odoo user, with all of that user’s permissions. Whatever the key’s user can see, the AI can see; whatever that user can change, an AI with writes enabled can change. That is why the first step is a dedicated user, not a key on your own admin account.
Step 1: Create a Dedicated Odoo User for the AI
Section titled “Step 1: Create a Dedicated Odoo User for the AI”Give the AI its own identity with the minimum access it needs. This keeps its activity visible in logs under its own name, lets you cut it off by deactivating one user, and caps the damage if the key ever leaks.
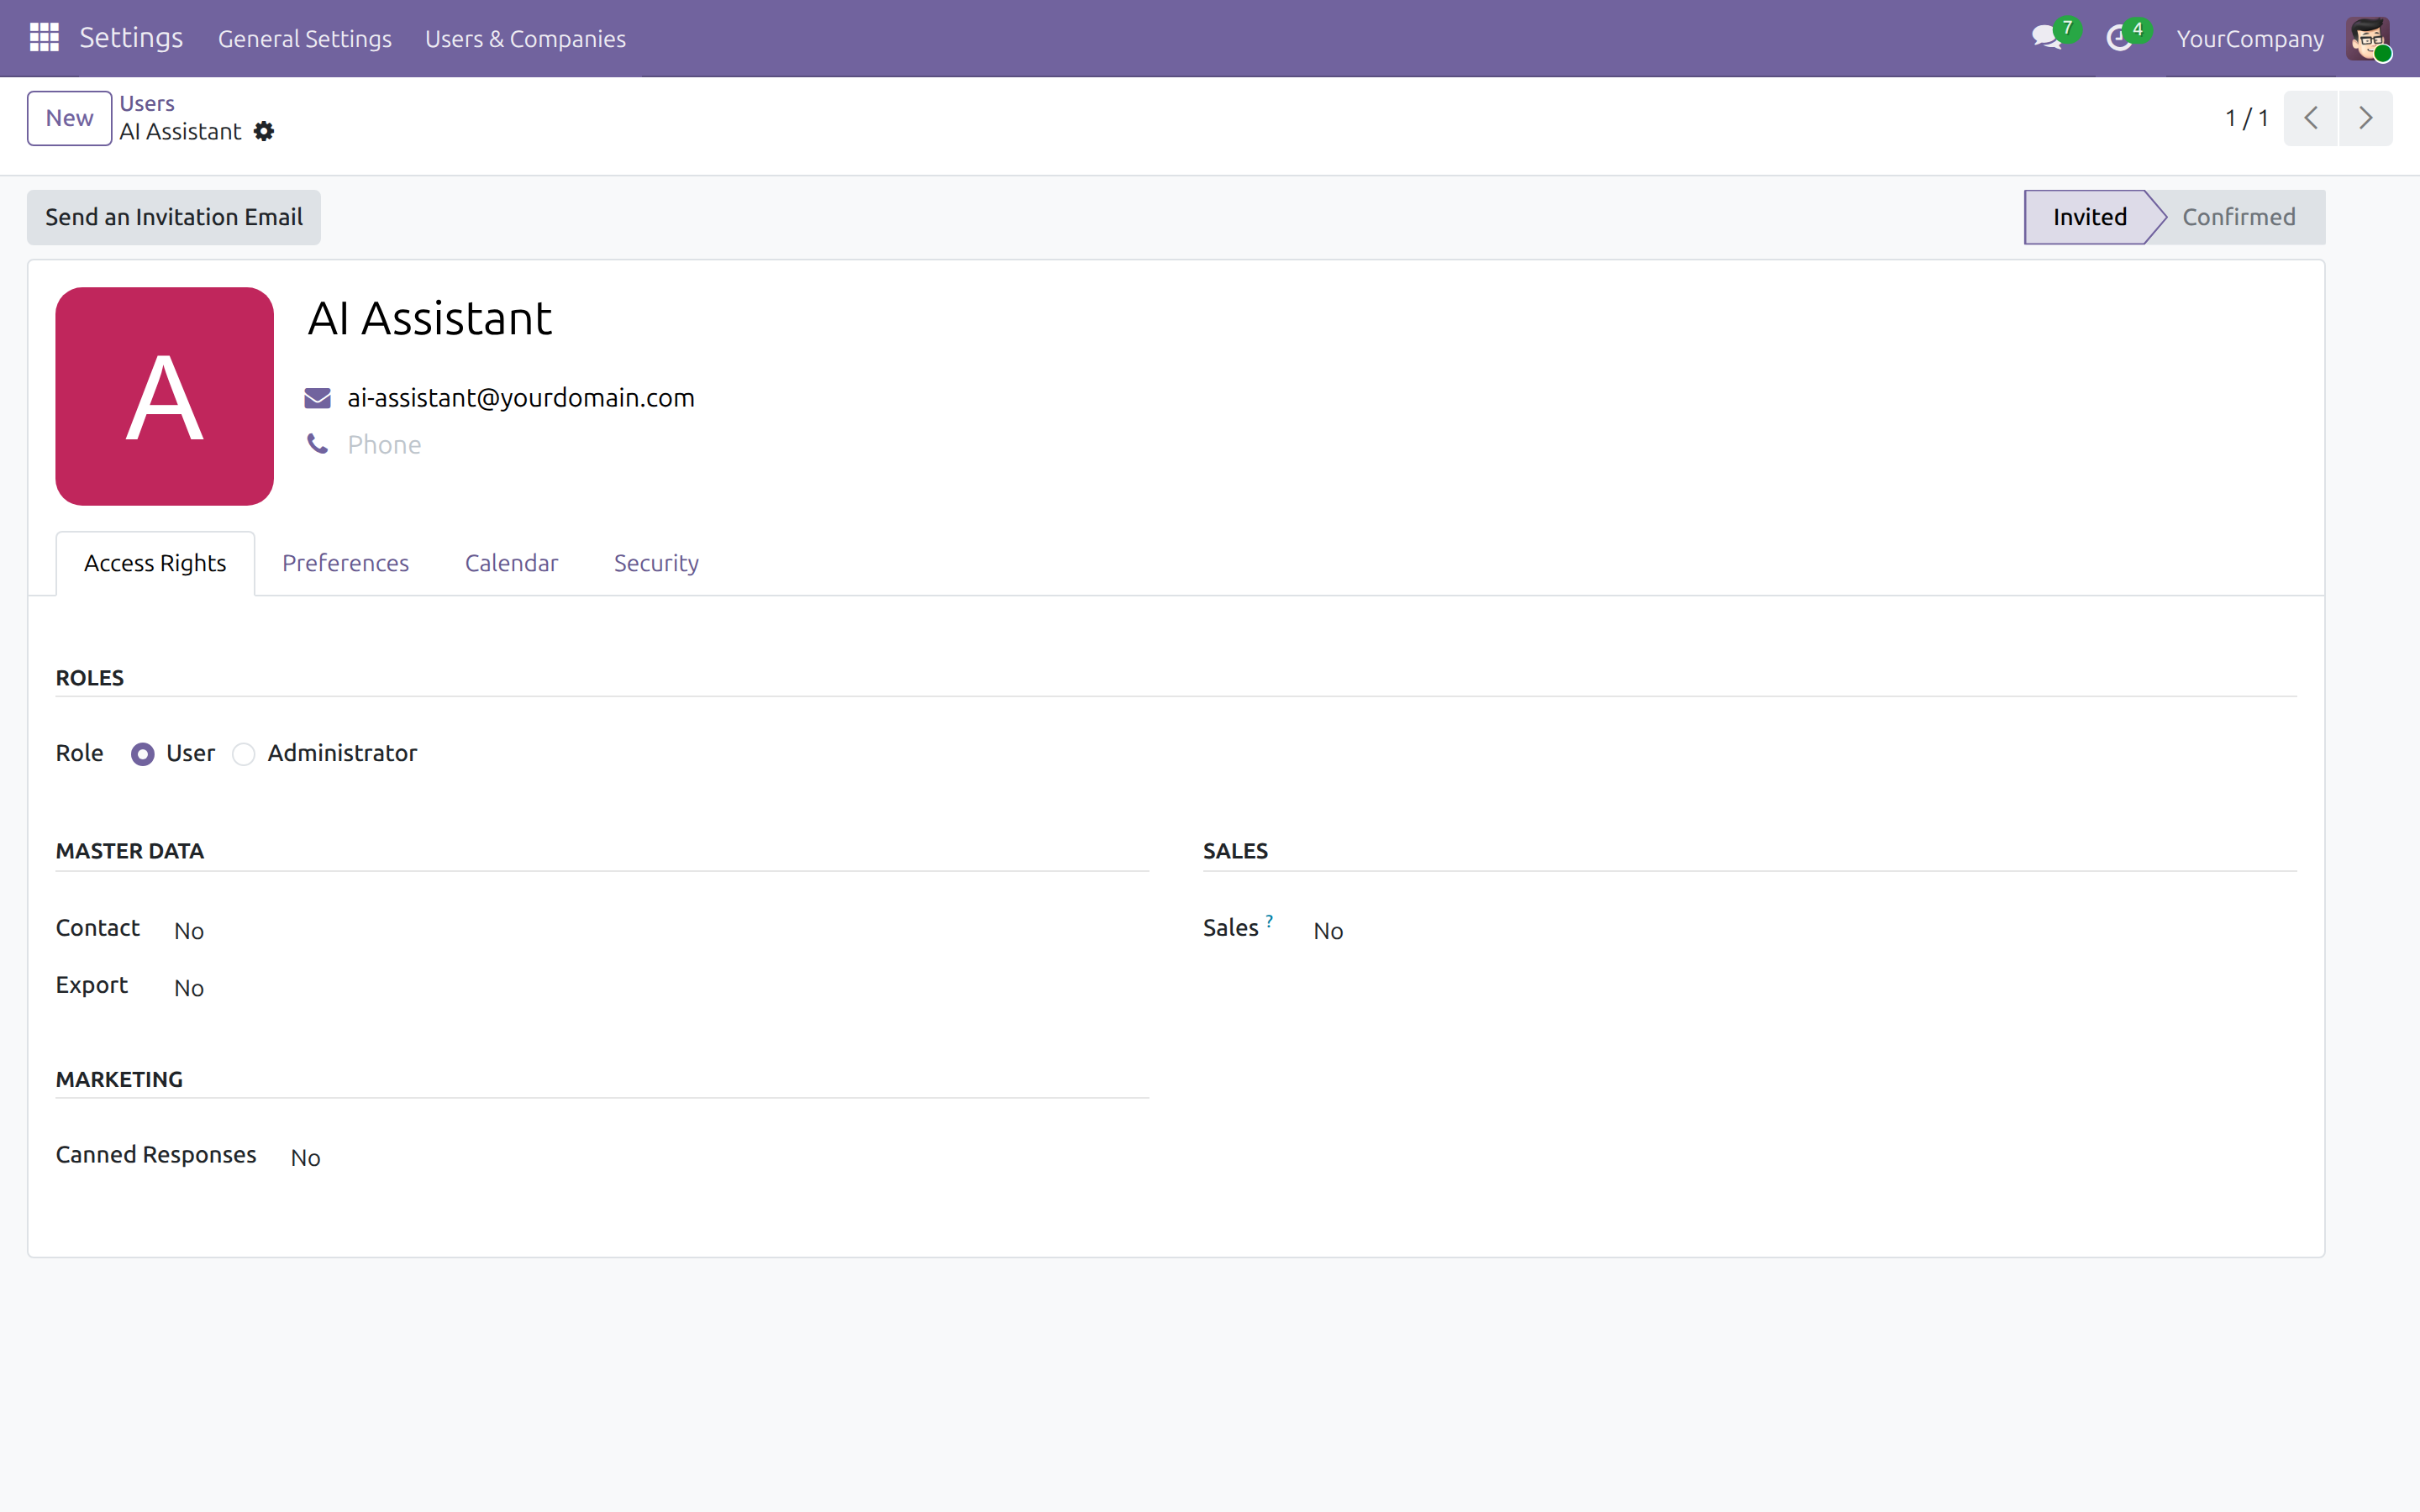
- In Odoo, go to Settings, then Users & Companies, then Users, and click New.
- Name it clearly, for example
AI Assistant, with an email address such asai-assistant@yourdomain.com(replaceyourdomain.comwith your own domain). - Under Access Rights, grant only what the assistant genuinely needs. For a read-and-report assistant, the lowest access level for the apps you want it to see is enough; do not give it Settings or Administration rights.
- Set a strong temporary password. You need it exactly once, to log in as this user and generate its API key in the next step. Once the key exists, have an administrator remove the password again: the official Odoo documentation recommends integration users have no password, so nobody can log in as them interactively, while their API keys keep working.
Step 2: Generate an API Key
Section titled “Step 2: Generate an API Key”API keys are generated from the user’s own preferences, so log in as the AI user with the temporary password from Step 1.
- Click the avatar in the top-right corner and open My Preferences.
- Open the Security tab.
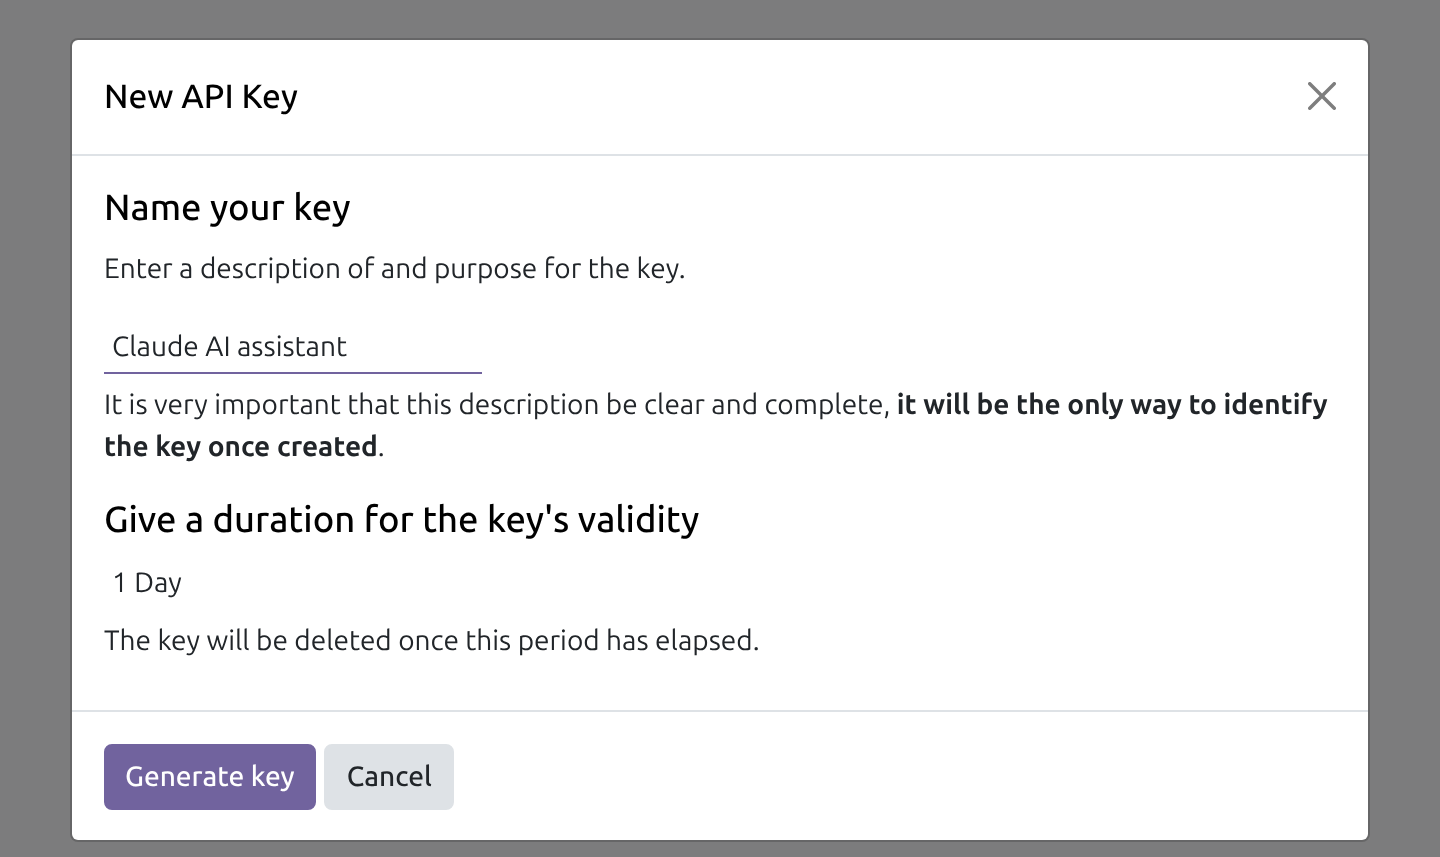
- Click Add API Key. Odoo 19 opens a New API Key dialog that asks for a description and a duration; both are required, and a key cannot be valid for longer than three months.
- Click Generate key and copy the key immediately. It is shown exactly once. Keep the canonical copy in a password manager.
- Log out of the AI user, and have an administrator remove its password again, as recommended in Step 1.
The three-month cap means integration keys expire quarterly by design. Put a reminder in your calendar; a key that quietly expires is the most common cause of an integration that “suddenly stopped working”.
Step 3: Connect Claude Through an MCP Bridge
Section titled “Step 3: Connect Claude Through an MCP Bridge”The bridge used here is mcp-odoo (published on PyPI as odoo-mcp, MIT licence). It runs on your own computer, talks to the stock Odoo external API, and needs nothing installed inside Odoo itself. It supports Odoo 16 through 19, speaking the classic RPC API by default; on Odoo 19 you can switch it to the newer JSON-2 API by adding ODOO_TRANSPORT=json2 to its environment, though the default works fine.
For Claude Code, one command registers it:
claude mcp add odoo \ --env ODOO_URL=https://odoo.yourdomain.com \ --env ODOO_DB=yourcompany \ --env ODOO_USERNAME=ai-assistant@yourdomain.com \ --env ODOO_PASSWORD=your-api-key \ -- uvx odoo-mcpReplace odoo.yourdomain.com, yourcompany, the username and your-api-key with your own values. The API key goes in the password field; that is intentional, the bridge sends it wherever Odoo expects a credential.
For Claude Desktop, add the same thing to claude_desktop_config.json (Settings, then Developer, then Edit Config):
{ "mcpServers": { "odoo": { "command": "uvx", "args": ["odoo-mcp"], "env": { "ODOO_URL": "https://odoo.yourdomain.com", "ODOO_DB": "yourcompany", "ODOO_USERNAME": "ai-assistant@yourdomain.com", "ODOO_PASSWORD": "your-api-key" } } }}One honest caveat: the configuration file (and your shell history, for the command above) holds the API key in clear text, protected only by your operating system account. That is standard practice for MCP configuration, and it is exactly why the earlier steps insisted on a least-privilege user and a short-lived key; if the computer is ever compromised, revoke the key from the Account Security page.
Restart the client and the Odoo tools appear automatically. From there you can ask things like “list open CRM leads worth more than 20,000” or “how many contacts are based in Dublin”, and the assistant answers from your live data.
Writes are off by default, and that is the right default
Section titled “Writes are off by default, and that is the right default”Out of the box the bridge refuses to change anything: asked to create or update a record, it returns write execution disabled. If you decide the assistant should be able to write, set one more environment variable, ODOO_MCP_ENABLE_WRITES=1, in the config above. Even then, every change goes through a preview and validation step before it executes, so the assistant shows you what it intends to change first. Run read-only until you have a concrete need, and remember the real ceiling is the Odoo user’s access rights from Step 1: the bridge can never do more than that user is allowed to.
Connecting ChatGPT or a Whole Team
Section titled “Connecting ChatGPT or a Whole Team”The bridge above runs per computer, which suits an individual. To give a whole team, or ChatGPT, access to one shared connection, the pattern is different: install an MCP server module inside Odoo itself, so the instance exposes an MCP endpoint (typically /mcp) on its existing HTTPS address, secured with the same Odoo API keys. One maintained open-source option is the MuK MCP Server module (LGPL licence, available for recent Odoo versions from the Odoo Apps Store). ChatGPT connects to remote MCP servers through its connector settings; consult OpenAI’s current documentation for which plans include custom connectors. If you run a Noiz-managed Odoo instance and want a server-side MCP endpoint set up and secured for you, open a support ticket and the Noiz team will scope it with you.
Calling the API Directly From Your Own Code
Section titled “Calling the API Directly From Your Own Code”For scripts, scheduled jobs and custom agents, skip MCP and call the JSON-2 API directly. The shape is always the same: POST to /json/2/<model>/<method> with the API key in the Authorization header. A quick test with curl:
curl -X POST https://odoo.yourdomain.com/json/2/res.partner/search_read \ -H "Authorization: bearer your-api-key" \ -H "Content-Type: application/json" \ -d '{"domain": [["is_company", "=", true]], "fields": ["name", "email"], "limit": 5}'A successful call returns plain JSON, here a list of company contacts. The same call from Python, using only the standard library:
import jsonimport urllib.request
ODOO_URL = "https://odoo.yourdomain.com"API_KEY = "your-api-key"
def odoo_call(model, method, payload):    req = urllib.request.Request(        f"{ODOO_URL}/json/2/{model}/{method}",        data=json.dumps(payload).encode(),        headers={            "Authorization": f"bearer {API_KEY}",            "Content-Type": "application/json",        },    )    with urllib.request.urlopen(req) as resp:        return json.load(resp)
leads = odoo_call("crm.lead", "search_read", {    "domain": [["expected_revenue", ">", 20000]],    "fields": ["name", "expected_revenue"],    "limit": 5,})for lead in leads:    print(lead["name"], lead["expected_revenue"])
Five things about JSON-2 that are not obvious from the examples:
- All arguments are named. There are no positional arguments at all. Record ids go in an
idsarray, method parameters by name;createtakes its records asvals_list,writetakesidsplusvals. - Each call is its own database transaction. You cannot chain calls into one transaction, so prefer single methods that do the whole job, such as
search_readrather than asearchfollowed by aread. - Errors are JSON and include a full Python traceback in their
debugfield. Useful when developing, sensitive in production: never relay raw Odoo error responses to end users. - Your instance documents itself. While logged in to Odoo in the browser, visit
https://odoo.yourdomain.com/docfor reference documentation generated from your database’s actual models and fields. - Multi-database servers need one extra header. If your Odoo server hosts more than one database, add
X-Odoo-Database: yourcompanyto each request so Odoo knows which database you mean. A typical single-database deployment does not need it.
On Odoo 18 or 17: use XML-RPC for now
Section titled “On Odoo 18 or 17: use XML-RPC for now”The JSON-2 API is new in Odoo 19.0 and does not exist on earlier versions. On Odoo 18 or 17, use the XML-RPC API as documented in the version-matched documentation; your API key works there too, passed in place of the password:
import xmlrpc.client
url = "https://odoo.yourdomain.com"db = "yourcompany"user = "ai-assistant@yourdomain.com"api_key = "your-api-key"
common = xmlrpc.client.ServerProxy(f"{url}/xmlrpc/2/common")uid = common.authenticate(db, user, api_key, {})
models = xmlrpc.client.ServerProxy(f"{url}/xmlrpc/2/object")count = models.execute_kw(db, uid, api_key, "res.partner", "search_count", [[]])print(count)
XML-RPC still works on Odoo 19 as well, but Odoo has deprecated it, with removal scheduled for Odoo 22 in autumn 2028. Point new integrations at JSON-2 and plan to migrate existing XML-RPC ones during your next Odoo upgrade.
One caveat that confuses self-hosters: the Odoo documentation notes that the external API is “only available on Custom pricing plans”. That restriction applies to Odoo’s own cloud platform (Odoo Online), not to self-hosted instances. On an Odoo Community server you host yourself or with Noiz, the API is simply there.
Security Essentials
Section titled “Security Essentials”- HTTPS only. The API key travels in a header on every request. A Noiz-deployed Odoo instance is served over HTTPS already; never point an integration at a plain
http://URL across the internet. - One key per integration. Give Claude, your reporting script and any third-party tool their own keys. Revoking one (from the same Account Security page) then never breaks the others.
- Least privilege beats trust. The AI user’s access rights are the only hard boundary. An AI assistant will happily act on a confused or malicious instruction; if the user it acts as cannot touch payroll, no prompt can make it.
- Start read-only. Leave writes disabled in the bridge until you have a specific, reviewed reason to enable them.
- Rotate on schedule. Keys expire within three months by design; treat the expiry as a feature and rotate deliberately rather than being surprised.
Troubleshooting
Section titled “Troubleshooting”- Symptom: HTTP
401withInvalid apikey: the key is wrong, expired, or was revoked. Generate a fresh key from the user’s Account Security page and update your configuration; remember keys cannot outlive three months. - Symptom: the bridge answers questions but refuses to create or change records, mentioning
write execution disabled: that is the default safety gate. SetODOO_MCP_ENABLE_WRITES=1in the bridge’s environment only if you have decided the assistant should write. - Symptom:
/json/2/...returns 404: your instance is running Odoo 18 or earlier, where the JSON-2 API does not exist. Use the XML-RPC example above, or ask Noiz about upgrading the instance to 19. - Symptom: the AI authenticates but sees no records, or far fewer than expected: access rights. The key acts as its user, so open that user’s Access Rights and record rules; what the user cannot see, the API will not return.
- Symptom: a method call fails complaining about arguments: JSON-2 takes named arguments only. Check the method’s parameter names at your instance’s
/docpage rather than translating positional examples from older tutorials.
Odoo Community on a properly secured server, plus a scoped API key, gives you an AI assistant that can genuinely work your ERP data without handing your books to a third party. If you would like Odoo Community deployed and hosted for you, or help wiring an assistant to an instance Noiz already manages, open a support ticket with the Noiz support team and describe what you want the assistant to do.