

How to Create a MySQL Database in cPanel
This guide shows you how to create a MySQL database from within cPanel. A database is where applications such as WordPress, Joomla, PrestaShop and most content management systems store their content and settings. Creating the database is only the first half of the job: on its own an empty database cannot be used until you also create a database user and grant that user access to it, so this guide covers that essential next step too.
Last reviewed: 27 July 2026, against cPanel & WHM (current stable release). This guide is written for Noiz hosting and is kept current against cPanel. It complements, and does not replace, the official cPanel documentation linked below.
Official Documentation Reference
Section titled “Official Documentation Reference”- cPanel » MySQL Databases is the reference for every field on this screen.
- cPanel » MySQL Database Wizard is a guided alternative that creates the database, its user and the privileges in one flow.
Prerequisites
Section titled “Prerequisites”- A Noiz hosting account with cPanel access.
- Your cPanel username and password, or single sign-on from the Noiz client area.
Create the database
Section titled “Create the database”- Log in to your cPanel account.
- In the Databases section, click MySQL Databases.

- Under Create New Database, type a name for the database in the New Database field. Read the note on naming below before you decide on a name.
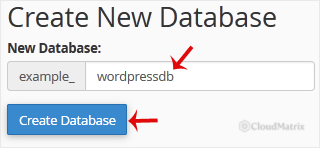
- Click Create Database. cPanel confirms that the database was added.

How cPanel names your database
Section titled “How cPanel names your database”cPanel automatically prefixes the database name with your cPanel username and an underscore. If your username is example and you type shop, the real database name becomes example_shop. Always use this full, prefixed name when you configure an application or a connection string, otherwise the connection fails with an “unknown database” error. Database names are limited in length and may contain only letters, numbers and underscores.
Create a user and grant access
Section titled “Create a user and grant access”An empty database is not usable until a MySQL user is attached to it. This is the step most people miss. On the same MySQL Databases page:
- Scroll to MySQL Users, then Add New User. Enter a username and a strong password, then click Create User. As with databases, the username is prefixed with your cPanel username, for example
example_appuser. - Scroll to Add User to Database, select the new user and the new database, then click Add.
- On the privileges screen, tick ALL PRIVILEGES for a standard application, then click Make Changes.
You now have four values to give your application: the database name, the database username, that user’s password, and the database host, which is localhost on Noiz cPanel hosting.
Faster alternative: the MySQL Database Wizard
Section titled “Faster alternative: the MySQL Database Wizard”If you would rather create the database, its user and the privileges in one guided sequence, open MySQL Database Wizard from the Databases section instead. It walks you through the same three steps across a single set of pages.
Troubleshooting
Section titled “Troubleshooting”Application cannot connect, or reports the database does not exist: confirm you used the full prefixed database name (username_dbname), that the user has been added to the database, and that the host is set to localhost.
“Access denied” for the database user: re-open Add User to Database and confirm the user is assigned to the database with the privileges the application needs.
You need to connect from your own computer or an external server: local, same-server connections use localhost. Remote connections must first have your IP address authorised under Remote MySQL in the Databases section, and then connect to the server hostname rather than localhost.
Need a hand?
Section titled “Need a hand?”If you are on a Noiz managed plan, the support team can create databases, users and privileges for you, or check a connection that will not come up. Open a ticket from the Noiz client area and include the application you are connecting and the exact error message.